As with the wilderness, it’s best to start at the bottom and work upwards, So: Dirt. But, wait, we already have dirt, don’t we? From way back in Part 2 - Paths in the Grass?
Eh, we can do better.
Dirt underground is often more heavily compacted, constantly damp and has a surface which is less even and more mud-like, particularly in a well trafficed dungeon. We need something darker and danker for underground dirt.
Before you start, you should create a Photoshop document with all the same considerations and steps that we did before in Part 1 - On The Grid. You also need to give the map a unused buffer area around the outside, just as we did in Part 3 - Water Features. Once again, we'll be using a bevel effect that we don't actually want to be visible around the edge of our map.
Once all that is in place, we can get started.
13.1 - Clouds
Create a new layer and call it "Dirt".
Pick two shades of a suitable groundy brown colour and make one your foreground colour and the other your background - it doesn't matter which is which. I chose #5e5351 and #4c4240 for my two shades. Then, go to the "Filter" menu, select "Render" and then "Clouds".

Photoshop's rendered clouds don't look much like clouds, to be honest, but the random, blobby shading it produces is a commonly used start to a lot of Photoshop tutorials. I've seen it as a first step to create fire, lighting, planetary surfaces and, uh, yeah, here's it's going to be dirt.
An important point about Photoshop's clouds is that it creates a pattern that tiles under certain circumstances (which I will get to in a moment). This gives you a choice - you can either create a big map, just fill the entire thing with clouds and not worry about tiling; or you can create a seperate, smaller canvas to create a tileable dirt pattern on and tile the result over your main map when it's complete. Up to you.
To create a tiled cloud pattern, you have to use a canvass which is a square and that has a number of pixels along each side equal to a power of 2. For our purposes, it also needs to be fairly big, so I suggest one of the following dimensions, depending on the DPI of your main map:
- 512x512
- 1024x1024
- 2048x2048
- 4096x4096
- 8192x8192
If you're not sure which to go with, 1024x1024 would be my choice here.
13.2 - Dirt
To make the clouds dirt-like, we need to call upon our old friend, Bevel and Emboss. Set up the layer style like so:

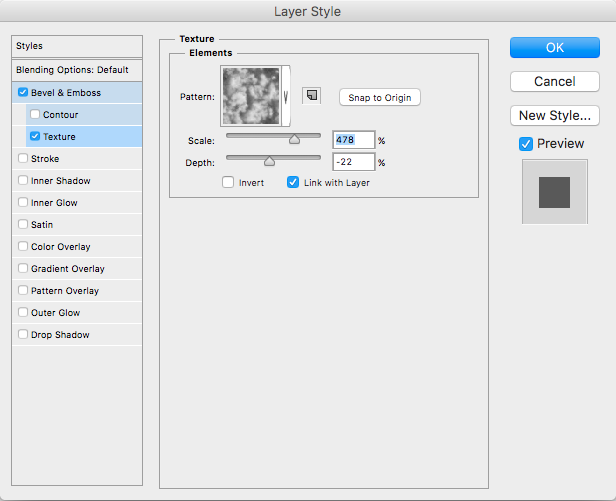
The particular texture pattern used here is found under the "Patterns" group.

Some other patterns may also work, so it's worth a try, but I like this one for the aforementioned, compacted, lumpy, damp dirt look.
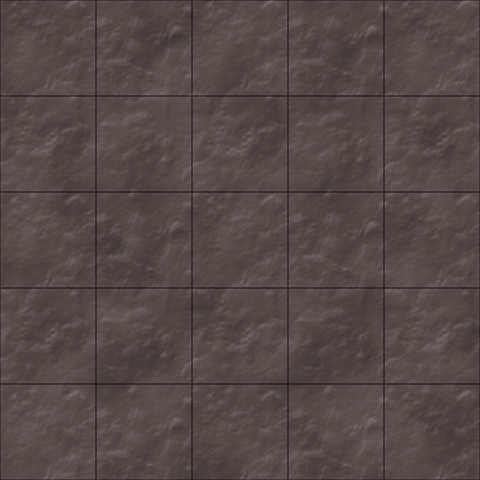
As this is going to be our bottom most layer, no more needs to be done here.
Stay tuned for Part 14 - Flagging Efforts.