Creating Battle Maps, Part 7 - Levelling Up The Map

If you're learning new things about Photoshop from these tutorials, then we've pretty much covered all the concepts that we're going to. There's just the one the one left and after that, everything is more of the same with some different tweaks.

7.1 Draw a Hill

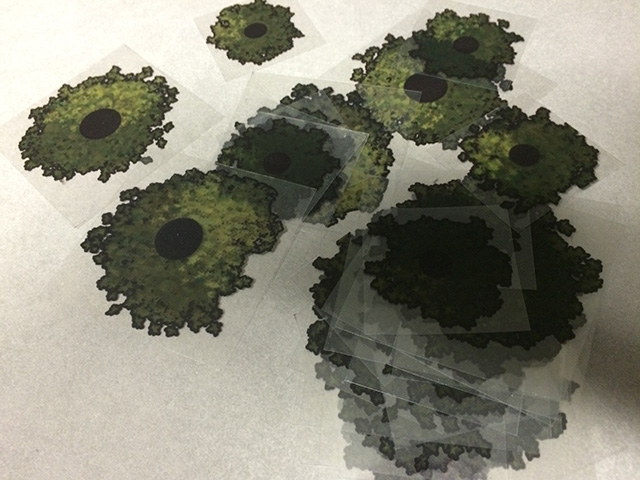
Load up your map, create a new layer called "Hill, Level 1" and draw a big blob of pure white in the middle. That's our hill.

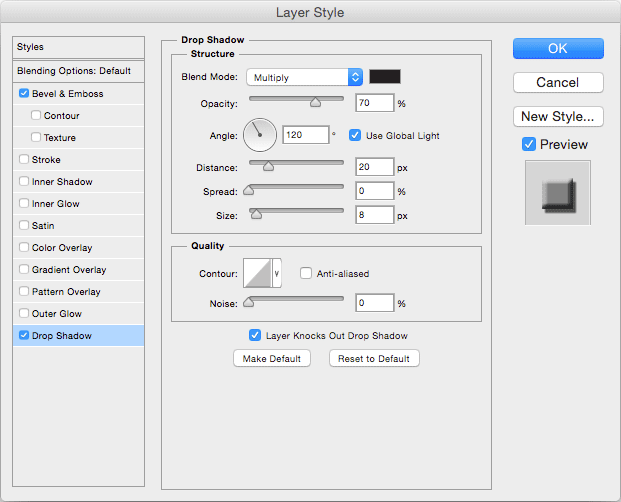
The first and, I hope by now obvious, step to make it hill-like is to give it a bevel and emboss Layer Style. It's fairly straight forward.

The result will look like this.

The bevelling looks great but the huge blob of white is clearly in the way. Our next step is to remove the white and leave the bevel.

7.2 Blending

Here we need Photoshop's blending options. The blending options can best be summarised as "how are we going to mix the pixels on this layer with the pixels of all the layers below?" There are a lot of options, some quite strange, but the one we want is "multiply". The multiply blending mode will make pixels translucent depending on how close to white their colour is. So, white becomes completely transparent, greys become steadily more translucent and black is as solid as it always is. However, multiply only affects the pixels on the layer, not the layer effects which are calculated afterwards. By switching the layer to multiply, the white will vanish and the bevel effect will stay as is.

You can find the blending mode right at the top of the layer effects panel.

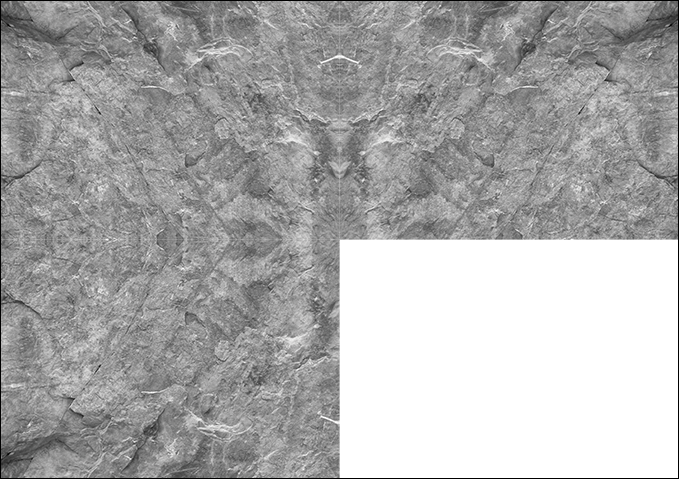
Once you switch it on, the effect is this.

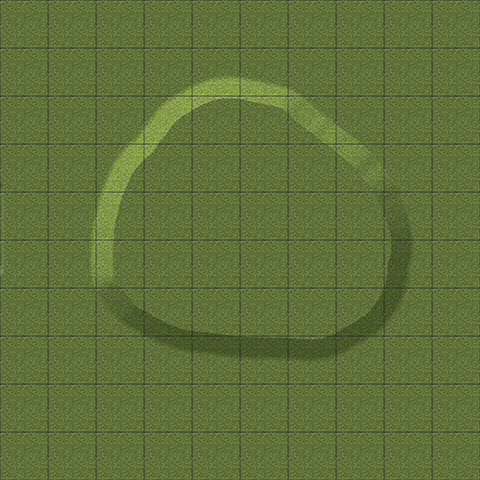
You can now draw all over the new layer in white and leave hills in the wake of your pen.

7.3 Drawing Hills

To create a contour map effect with multiple levels, all you need is multiple layers. So, "Hill, level 2", "Hill, level 3" and so on.

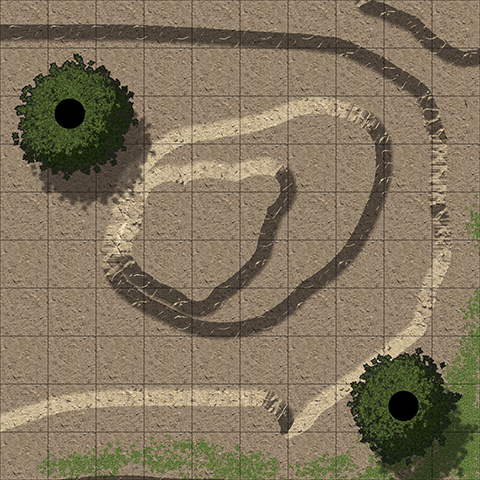
Here's an example on a more detailed map from an earlier tutorial with a hillside leading down to a river..

battlemaps7-8.png

I think a hard brush works best but a soft one still works just fine - the effect is just a little different. There's not much in it though, and I'm happy for it to be a matter of preference.

7.4 - An Alternative Effect

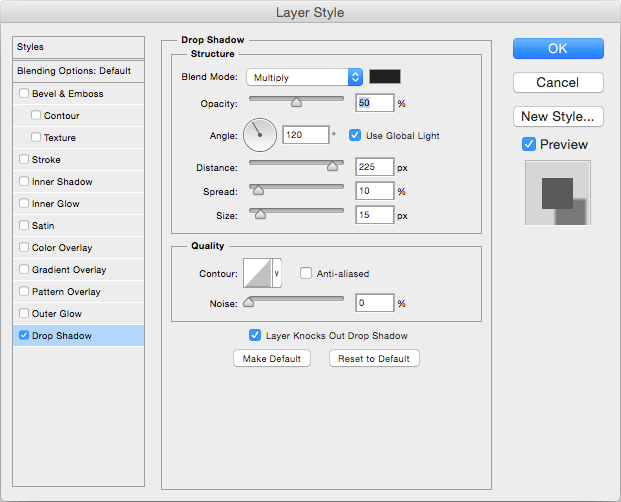
There is a second bevel effect I use for hills. It looks more cliff-like and only works really well on dirt (less so on grass). It all works the same way until you get to the bevel. Set up the layer style like so...

We also need a texture bevel to give it a broken, rough look. I encourage you to fiddle around with different textures to see what you can create but the setup I went with is this...

With this more broken, more cliff-like hill contour, you can create more desolate, rockier landscapes.

Creating Battle Maps, Part 5 - No Stone Unturned

5.1 Stone Texture

It took me a while to create good looking stones. There's nothing much new here but the subtleties of the settings for the layer styles ended up being quite important.

The first steps should be very familiar. Create a layer called "Stones", fill it with a suitable stone-like texture and create a layer mask. In this case, I used a photograph of the surface of a rock at a quarry and desaturated so it was a suitably rocky grey instead of the actual rocky brown of the original.

The benefit to it being my own work is that I can provide the original texture. Click the thumbnail below to download (careful - it's big 'un).

This texture doesn't seamlessly tile - not even close. This is for two reasons.

  1. Making a texture seamless is fiddly and annoying.
  2. We can cheat.

The cheat is based on the point that the stones will be small and the texture large. We still don't want seams but we can make seams that look awful but that work perfectly okay once we have a layer mask and layer styles applied.

Basically we flip it. We start with our whopping great big photograph in one corner of our canvass.

Flip it horizontally.

Then vertically.

And then both.

The result is a texture that tiles but not completely seamlessly since it looks like rock kaleidoscope. Again, though, once this is set up for drawing stones, it works just fine.  If you are interested in creating a truly seamless texture, there are a vast number of tutorials on the web.

5.2 A Few Quick Stones

Once you have your texture tiles across your canvass and a layer mask applied, we can create a few quick stones so we can see what we're doing. A small hard edged, round brush is best here.

They look truly awful but bear with me.

5.3 Layer Styles

First we need a 3D effect on the stones, which usually means a Bevel and Emboss layer style. Set it up as below.

The next thing any 3D object needs is a shadow. Set up a drop shadow for the stones as below.

The result should look like this.

That's not bad at all but the stones look a little out of place. The problem is that these stones are rounded but there is no shadow on the sides. They are shading the ground but the ground isn't shading them.

An inner glow can fix this. However, "glow" is a bit misleading. With these settings, it's more like another shadow effect.

We have some very good stones now but in my endless tweaking and fiddling around, I found one more effect I like to add. If your computer is starting to struggle with the multiple, high resolution, A3 layers with numerous layer styles, perhaps you should leave this one out. Otherwise, we can add a bit of 3D detail to the rocks using a texture bevel, which is a sub-category of bevel and emboss.

battlemaps5-11.png

Pretty much any texture will work well here. After playing around, I picked the same one I used on the water but I don't think there are many bad options and you can pick your own. Be aware that the scale and depth that looks good will probably be different for each texture, so it's worth mucking around with the sliders.

5.4 Drawing Rocks

Once again, you already have the basics. A smallish, hard edges brush is the way to go and you should always make the rock more than just a circle, since that looks unnatural. Variations on a slightly lumpy oval work well.

Stones work well to add a bit of interest to otherwise boring grassy plains but I also use rings of them for campfires and, as you've seen, stepping stones across creeks.

With the stepping stones, however, there is one more thing to do. Here's a close up of what we have now.

The stones are kind of sitting on top of the water and not affecting the flow at all. We can fix this with these steps.

  • Select the contents of the stone layer by holding down Control (on the PC) or Command (on the Mac) and clicking on the Stone layer mask thumbnail.
  • Select the water layer's mask.
  • Press backspace.

This will delete the water where the stones are placed, giving them the shallow water effect around them.

Creating Battle Maps, Part 4 - Trees for the Forest

4.1 Foliage

Grassy plains are all well and good, but we need some cover. Our next order of business is some trees. As with the water layer, we will be using a combination of a layer mask and layer styles, and we need to start with a texture that makes for nice looking trees. We can certainly go online and find one but I had more luck constructing my own out of filters.

  • Create a new layer and call it "Trees".
  • Fill the entire layer with green. Nothing too bright, although we can adjust it later if need be. I used #44550F.
  • Go to the "Filter" menu, select "Noise" and then "Add noise".
  • You need uniform, monochromatic noise and the amount should be 10%. See below.
  • Go back to the "Filter" menu, select "Pixelate" and then "Crystallize".
  • Pick a cell size of 10 and click "OK".

The result doesn't look very leafy but we don't need it too. We just need a broken collection of green shades to give the right impression. The shape and depth of the tree will do the rest, and for that we need layer styles.

4.2 A Quick Tree

First, as we did with the water, we should draw a tree so we can see what we're doing. Create a layer mask for the tree layer, lock the tree layer and then fill the mask with black. Next, draw a roughly circular shape with the maple leaf brush and make sure the middle is well filled in. That's our tree.

4.3 Depth and Shadow

We can now give the tree a more three dimensional, realistic look with layer styles. First, the tree needs to cast a shadow. Give it a "drop shadow" layer style as follows.

battlemaps4-4.png

Next, we can add some roundness to the treetop with an inner shadow.

Finally, I found that a black line around the outside helped pull the tree from the background.

battlemaps4-6.png

The end result should be something like this.

4.4 Tree trunks

As it stands, the tree is a little misleading. What we're looking at is the foliage but what stops the players is the trunk. They can stand under the foliage.

This is easy to fix. Create a new layer called "Tree trunks". This layer has no tricks, no effects and no mask. You just use a hard edged round brush to put a black dot where the trunks of your trees are.

4.5 Drawing Trees

You have already seen the basics: draw the trees with the maple leaf brush and create a trunk with a black, round brush. However, when you do so, be mindful of the grid. Players will often take cover next to trunks or under trees so I generally try to make sure the trunk is centred in a square or on a vertex. 

I also generally put the tree layer on top of the grid layer. It helps give the impression that they are taller than everything else on the map.

One side effect of this technique of creating trees is that they look odd if they touch. If you want very dense trees, you may want to create two or three tree layers and draw different trees on different layers so that they overlap. You can also use multiple tree layers to make trees with slightly different colouring. This looks especially good with autumn colours but even on maps with just green trees, a few different shades helps make the forest look more varied and realistic.

The final trick is not to put trees on your map at all. Instead, print them on overhead transparencies and cut them out. You can then scatter trees on a map any way you like, depending on circumstances. Make sure you have a good variety of sizes and colours.

Creating Battle Maps, Part 2 - Paths in the Grass

2.1 The Ground

With a canvas in place and a grid overlaid, we can now start creating layers for our various map features. Beneath them all, we need the ground - plain dirt.

The technique is the same as creating the grid. We need a dirt texture - one that tiles neatly and seamlessly - out of which we can create a fill pattern. Google Image Search is your friend here but you need to make sure you have the owner's permission to use the one you find. There are plenty of good seamless textures which allow you to use them for personal use free of charge.

Once you have your texture, follow these steps...

  • Load the texture file into Photoshop.
  • Reduce the image size to one inch by one inch, at whatever DPI you are using for your map.
  • Create a pattern out of the inch-square piece of dirt, just as you did with the grid.
  • Go to your main map canvass, create a new layer called "Ground" and fill it with the new pattern, again as you did with the grid.

You may find the texture works better at a slightly different scale - say, for example, shrinking it to 2 inches before you define it as a pattern. You can also adjust the colours in Photoshop to get a look you are happy with.

2.2 Grass

Creating a grass layer is done the same way with a few additional steps. The grass, unlike the dirt, is no mere background. We need to be able to paint grass with the Photoshop brushes and create shapes and areas as needed. However, the first steps are the same as for the dirt: Find a grass texture, create a pattern and fill a layer as you did with the ground. Call the layer "Grass". It should, of course, go atop the ground. For now, it will cover it completely.

Next you have to create a layer mask. This is the trick that allows us to "paint" with grass. Make sure you have the grass layer selected and click the layer mask button at the bottom of the layer palette.

Once you've done so, your grass layer should look like this.

On the left, you have the layer thumbnail, as normal. On the right is the layer mask. You can select and draw on either one by clicking the thumbnail.

If you're unfamiliar with layer masks, they determine what parts of a layer will be displayed. If you draw on the layer mask in white, it will reveal the grass where you draw. If you draw on the mask in black, it will hide it. By using black and white pens, we can now draw with grass. The handy thing is that you're never actually changing the grass layer so you can draw and erase over and over again without losing the grass texture itself.

However, it is easy to forget, accidentally click on the grass layer (rather than the mask) and start scribbling. To prevent that, we can lock the grass layer. To do so, select it by clicking on the left most thumbnail and click the "Lock Image Pixels" button above the layers.

Once locked, we can no longer draw on the grass layer (although we can still select it) and it will protect us from mistakes as we create maps. When you're drawing with grass, you should instead be working on the layer mask.

2.3 Drawing With Grass

Much of the time, you probably want to fill the screen with grass and then erase it back to dirt to create clearings, paths and so on. Whether you're drawing with grass or erasing it, I recommend using the maple leaf brush, which you can find near the bottom of the list of default Photoshop brushes.

The brush produces a tatty, natural look, making the grass appear more realistic.

battlemaps2-5.png

Creating Battle Maps, Part 1 - On The Grid

1.1 Create a new Photoshop image

This is more involved than you might think so I'll start by giving you the short version: I use a 20x20 inch CMYK image at 300dpi.

Now the long version.

Obviously, you want a map tile which is a fair size so you should use A3 as your starting point. However, few printers can print right to the edge of the page so you won't be able to use the entire area. Also, remember that we need a one inch grid for D&D battles so we need to round the size down to the nearest inch.

I used to create map tiles that were as big as I could fit on A3 with the printer I had access to - 16 inches by 11 inches - but later moved to square map tiles so they could be arranged in more versatile ways. A square map tile on A3 can be up to 11 inches but that was so close to 10x10 that I thought I might as well go for a round number. It makes working out ranges simpler if each map tile is 50ft (assuming a standard five foot grid).

Making a 20" x 20" canvass in Photoshop means four 10" map tiles in a 2 x 2 grid. That's enough room to draw some decent sized battlefields without worrying about the map edges but how many tiles you want probably depends on the size of your gaming table more than anything else. Most are longer in one dimension than the other, so maybe a 2 x 3 map tile grid (or 20" x 30") would be better. Whatever the size, you can later chop them up into 10" x 10" tiles for printing. 

Then there's the issue of resolution. These maps are going to have a large number of layers with complex filters and layer effects on them, so you can get a fairly hefty files size very quickly. If you have a powerful computer with lots of memory, Photoshop should be able to handle it, but a lesser computer might find it easier if you reduce the resolution of the image. In practice, I found that people wouldn't notice maps even as low as 100dpi. 200dpi is probably safe and 300dpi should only be used if your computer has the horsepower to handle it. However, note that you can always reduce the DPI later but increasing it is complicated enough that you might as well not bother. With that in mind, I choose 300dpi.

Finally, as we are going to print this out, it's best if the colour mode is CMYK, which is what printers use.

1.2 Create a Grid

Not everyone plays D&D with a grid but even if you don't print it out, a grid layer is a useful reference when creating a map. Photoshop makes this pretty easy.

  • Create a new image which is one inch square at the same DPI as your main map. So, for me, this is a 1 inch by 1 inch by 300 dpi image.
  • Create a new layer.
  • Go to the Edit menu and select stroke. Create a 2 pixel, black inside stroke. (You can make it thicker if you wish but two pixels seems adequate.)
  • Switch off the background layer.
  • Go to the Edit menu and select "Define pattern". Call the pattern "1 Inch Grid"
  • Close the 1 inch image. Don't bother saving it. We've got the pattern now. Return to your main map canvas.
  • Create a new layer and call it "Grid".
  • Go to the Edit menu, and select "Fill".
  • Where it says "Contents" select "Pattern" and then your new, 1 inch grid pattern. Click OK.

You now have a 1 inch grid overlaying your map canvass. It's useful to add it first but be aware that you probably want to keep shuffling it to be the utmost top layer, with perhaps just trees and similarly tall things covering the grid for a minor depth effect.

I also prefer to reduce the opacity of the grid slightly but it's best to play with that once you have some detail on your map.

Creating Battle Maps, Part 2 - Paths in the Grass

Creating Battle Maps - Introduction

Extra gross Beholder designed by DireNumbat, my current DM.

Extra gross Beholder designed by DireNumbat, my current DM.

I have an unfortunate love of problem solving and tweaking, plus a high standard for the tools I work with, so when I was DMing a game of Dungeons & Dragons a few years back, I took it upon myself to create my own detailed battlemaps for combat. Drawing a map is one thing but I wanted a system by which I could do so quickly and which put most of the effort on the computer. Starting with grass and dirt, I moved through terrain features one at a time, building up my master battle map as I went and using it to create battle maps for encounters in my game as I did it.

Then, about a couple of years ago, I decided I should make them into a set of tutorials online for other people to use.

Er... And then I procrastinated for a bit.

Anyway...

The Premise

Photoshop has layer styles - special effects like shadows and glows which apply to a layer in your image. What is so useful about them is that they are calculated on the fly rather than applied just the once. So, if you apply a drop shadow style to a layer in Photoshop, everything you then draw on that layer will get the drop shadow.

A complicated combination of layer styles, however, and you can draw, with a single sweep of the mouse, a river.

Or paths, or rocks, broken ground, hills, sand, snow, ice... Once this is all set up, you can draw maps as quickly and easily as scribbling the basic shapes. This one, for example, is pretty slapdash. It took me two minutes and thirteen seconds.

I timed it.

What You Will Need

First and foremost, Photoshop. Much of this tutorial can probably be done in something like Pixelmator but I know that much of it cannot, too. Photoshop is your best bet.

Secondly, a passing familiarity with Photoshop. These tutorials would get far too bogged down if I went into every detail of how it is done. I will be assuming you are familiar with the software, although not necessarily an expert.

Thirdly, you will eventually need access to a colour, A3 printer to print the maps out so they can be used. Black and white is doable but not nearly as cool and A4 is just a little small to work with. Fortunately, A3 colour laser printers are far more common and far cheaper than they used to be.

Fourth, patience. There is quite a lot to cover but, once you're done, you can use this template to create battle maps in minutes rather than hours.

Creating Battle Maps, Part 1 - On The Grid